Nov 29, 2007

Eatable Sunshine

Ah, the joy of bakerapy (i.e: baking + therapy. My lame attempt to coin a new word!) Crack an egg, and the muscles in your back feel less tense. Throw in some sugar, flour, a pinch of salt, and your fingers relax from typing on a computer all day. Whisk and mix, and your brain benefits from the hypnotization of a batter's swirl. Optionally- but highy recommended- add some fruity or nutty colours, and let your eyes soothe away (beats cucumber slices or teabags any time!) Bake and wait...and unwind...

What is there not to like about baking? (and cooking of course).

So basically, I treat myself to some baking therapy every once in a while. Most often after a long day at work. Last night for example, I made an abricot-almond-orange flavoured cake. However, when I had started making it, those flavours were definately not what I had in mind. Actually, I had nothing set or fixed in my head. I just gradually start throwing in ingredients, crossing my fingers that it will be eatable once out of the oven!
It looks eatable, and I hope it is because this is for sharing. So I better make sure I'm sharing something of decent taste.

Well to be honest actually, I tried a piece before just incase...you never know what happens when you're not following recipes!

And I really do not want to flatter myself, but it tastes freakin' good! It's like fluff with cream and crisp! Something I'd offer in the morning or afternoon. It has a generous comforting feel, and is like eatable sunshine in the midst of a cold winter day.

So I'm cutting this post short, but the recipe is included- just continue reading!

Recipe for Eatable Sunshine

Ingredients:
(For the batter, I followed a 50/50/50/50 "basic" batter)

  • 50gr eggs
  • 50gr sugar
  • Orange essence or orange zest
  • 50gr butter
  • 50gr flour
  • Baking powder
  • Marzipan
  • Abricots
  • Shredded almonds + butter + sugar
How to make it:
  1. Preheat oven to th5. Roll out marzipan into a thin layer. Wash abricots, dry, and dice.
  2. Mix egg, sugar and orange essence/zest
  3. Add in butter and mix
  4. Add in flour and baking powder. Mix
  5. Place batter in a cake mould.
  6. Add layers of marzipan, covering almost entirely the batter
  7. Throw in the diced abricots
  8. Bake in oven for 30 minutes.
  9. During baking time, place a knob of butter in a pan over heat until it melts (don't let it burn!)
  10. Then add the shredded almonds and sugar. Caramelize. Set aside
  11. When cake is ready and out of the oven, sprinkle the almonds on top for a finishing touch.

Eat warm or cold- either way, you'll still get the fluff, cream, and crisp textures!

Nov 25, 2007

Pomegranate dreams

Is it just me, or does anyone else dream about food too? Well last night my dream was something like a "kitchen scan"...scanning through closets and drawers figuring out what ingredients could become my next targets for a baking experience. Then suddenly, my kitchen radar stops and beeps at three big red round objects. Three big pomegranates I had been ignoring for the past few days, ever since a family member had brought them back from Egypt. Last night however, all I did was pretty much dream about them and their jewel like shiny seeds...


So, continuing on my dream, I could do several things with the pomegranates. One was using them in a spinach pie, along with feta and walnuts. But then I thought "nah, we've had that so many times already". You see, my mom and grandma always always use pomegranates in spinach pies, and so I pretty much grew up eating that many many times a year. So, no thanks- even if it is delicious indeed, but I want to do something different! Then I thought what about pomegranate macarons...wait...did I just say macarons? Come again? (And now for this part, I'm talking to myself) "Marianna, have you gone insane? Try to already get macarons right in the first place, then you can start dreaming of pomegranate macarons. Pff! Huh! What do you think you are, some kind of Miss Hermé? Continue dreaming".


Hmmm OKAY...


So then my third option was pomegranate jam- something easier then macarons. I wanted to make a pomegranate & vanilla jam. On second thoughts however, I remembered we had so many pots of jam already, and they really needed to be eaten and finished before I start making new ones.

But wait, that pomegranate and vanilla combo sounded intriguing. So I stayed on that idea, slept on it and woke up this morning making these:


Pomegranate and Vanilla tartlets. It was perfect, I had all the right ingredients! There was left over puff pastry from yesterday's orange-marzipan tarts, the three big red pomegranates of course, vanilla pods, and...marzipan! Marzipan again?! Well yes, it tastes so good and it seems to always enhance tart-type pastries! So once I woke up, brushed my teeth, and made myself some white tea, I impatiently ran to the kitchen to make a dream finally become a reality. For the recipe, continue reading...


Pomegranate & Vanilla tartlets


Ingredients

  • A big pomegranate

  • Vanilla pod or essence


  • Sugar


  • Marzipan


  • Puff pastry


How to make them:


  1. Wash your pomegranate, cut in quarters and take out the seeds. Keep the seeds in a bowl aside

  2. If you're using a vanilla pod, cut in length and scrape out the seeds.

  3. In a pan, place half a cup of sugar, the vanilla seeds (or a few drops of essence) and the pomegranate seeds. Add in seperate doses a cup of water (start with 1/3 of it, and with time, you'll know if you need to add more of it)

  4. Place the pan on medium heat for about 15-20 minutes, until it becomes all sticky. So the water you'll be adding depends on the evolution of the "stickiness".

  5. Remove pan and let cool

  6. Preheat oven to th7.

  7. Take out puff pastry, roll out and cut out preferred shape

  8. Roll out the marzipan, and place in the middle of the puff pastry portions, leaving space for the outerside borders.

  9. With a spoon, place the pomegranate vanilla mix generously, but always only in the center

  10. Bake in oven for about 10 minutes


Enjoy! I personally wouldn't mind making this again for an apéritif with champagne.

Nov 24, 2007

The nameless dessert

Oh my God, OMG, oh my gosh, however you like to write it... but the point is: OMG, I can't find a name for this dessert that I've made! Very frustrating indeed! And now that I've mentionned it, this dessert is the result of frustration- winter frustration! I just wish it could be summer all year long!!! I can't stand having cold hands and feet all the time, driving to work early in the morning when it's dark...and coming back home from work...and it still being dark! So to cheer me up, fortunately there's the wonderful therapeutic effects of cooking! I am SO convinced more then ever that the best medecine in the world happens to exist in our very own kitchens.


One way that drifts me to a summery place is daydreaming of flavours and colours to use in a future recipe. I start imagining a certain palette of colours, textures and tastes...then count down the days until I finally have the time to make it all become real. For this go, I must had been thinking of many pinks and whites, because the result turned out to be:

I am still not so good with "verrine" type desserts, but hopefully I will improve. These cups contain a base of biscuits roses de Reims followed by a raspberry coulis, a layer of litchis in a rose petal confit, coconut ice cream and loukoum for decoration. All these ingredients taste wonderfully good together... but I still haven't come up with a name for this dessert!


Litchis & Biscuits Roses de Reims


After having made this, I certainly do admire those people who manage to make picture-perfect verrines! I always end up with a mess of layers...which nonetheless tastes good once eaten. If only photographs could allow viewers to see...and taste!

But what counts the most, is that for those minutes of eating the "nameless dessert", my mind and thoughts were no longer in cold Paris...but away on an island, with the sun shining all day over sandy golden beaches and deep turquoise waters... if only...

Recipe for the nameless dessert:

Ingredients:


  • Biscuits Roses de Reims

  • Raspberry coulis

  • Litchis

  • Rose petal confit

  • Coconut icecream

  • Loukoums

  • Shredded coconut

Method (pretty straight forward, as you will see!):


  1. Dice peeled litchis, and mix them with rose petal confit. Set aside.

  2. Take out the glass containers, cups, verrines..whatever it is you will use.

  3. Place a layer of biscuits roses de Reims. I like a lot of crunch, so my layer is thick.

  4. Follow by raspberry coulis

  5. Then, add a layer of the rose petal litchis.

  6. Soften up coconut icecream, and spread a thick layer of that. You can also just place a scoop of ice cream if you want to go quicker...

  7. Decorate with shredded coconut and small pieces of loukoums.

  8. Place in freezer for about 10-15 minutes, just so that the softened ice cream becomes icecream once again. Don't keep in freezer for too long though, because then the litchis will become icecubes!

Enjoy!


P.S: my favourite part is the magical element the loukoum adds to all the other textures! You'll understand why if you make this!

Delightfully Bitter

Winter & oranges, like peas in a pod! Although I am not a big fan of oranges myself (you'll rarely ever see me eating or drinking them) but it just happens to be that the people around me are orange-ivors! And when I bake or cook, it's rarely for myself- I prefer sharing and giving! Especially around the holiday season!

So for this time, I made two desserts. One that's simple and a real crowd-pleaser, and the other (will post about it soon) is a bit more "sophisticated"- if I may put it that way...?


And here it is: orange-marzipan tarts, that tend to dissapear quite quickly let me warn you :-)


But these tarts require some work beforehand. And when I say work, it doesnt mean washing and slicing oranges. It means being terribly patient and waiting for a good 30 mins for the orange peels to become edible...and then waiting for them to cool down...before they can finally be used. All of that is explained in the recipe below.


Vitamin C!


Yet overall, these are easy to make and quick to bake, and definately should be eaten once out of the oven. They do have a bitter taste (which I personally like), but that can be covered up by simply adding more sugar to the recipe.


I usually associate marzipan to apple tarts, but with oranges the taste becomes even more interesting! When I had my first bite, I felt that the marzipan's almondness and texture brought in a serene edge which creates a contrast with the more vibrant sticky and bitter oranges. All of that with a gigantic puff-pastry crunch! At the very end, I also decided to sprinkle some cinammon...now wondering what it would had tasted like if I had sprinkled ginger instead...hmmm!

Anyway, here is the recipe for orange-marzipan tarts:

Ingredients:


  • Puff-pastry (you can make it, or buy a ready made one)

  • 3 big oranges

  • 1 cup sugar

  • 1 1/2 cup water

  • A bar of marzipan

  • Cinammon or ginger (optional)

How to make it:


  1. Wash and slice oranges.

  2. In a big pan, place the orange slices along with the sugar and water. Place pan on medium heat for about 30 minutes- once the orange peels become translucid and the slices become sticky. Then remove slices and place neatly on a plate. Let cool

  3. Preheat oven to th7.

  4. Take out puff pastry and cut into your preferred shape and place on a baking sheet & pan

  5. Roll out the marzipan into your desired thickness, and place on puff pastry. Leave some empty space for the borders.

  6. Arrange the orange slices on top of the marzipan.

  7. Bake for about 10 mins.

  8. Take out of oven. If you wish, you can sprinkle lightly with either cinammon or ginger. With or without, it's delicious either way! Eat hot and fresh to enjoy the fluffy crispy puffy pastry!

Note: if you don't like your oranges too bitter, you can add more sugar to step 2.

Nov 19, 2007

Truffle twist

Oh my goodness! What a relief! This truffle-xperimentation has been on my mind for quite a while, and I have finally found some time to try it out! Yay!

It has been weeks since I've wanted to do a salted caramel based truffle, and here it finally is! Just four simple ingredients for pure delight (recipe is posted at the end).


Dark chocolate + cream for the ganache. Salted almonds. Sugar. Et voila, that's it really!

Oh no, wait!! OOPS! There is also unsweetened cocoa that needs to be included in the photo! Sorry, I just realized that now as I'm writing this very sentence. So that means 5 ingredients in total- which is still not a lot.

These truffles are easy, but it does take time to make- and I'm a bit messy with the cocoa flying all over the place on the kitchen floor! You do have to be patient, and don't screw up the caramel.


My mom told me that her grandma uses this technique for determining when the caramel is ready- you get a small glass of water and drop in a spot of caramel. If it hardens, then it's ready, if it floats and is still liquidy, then it's not ready. I'm not sure what the reasoning is behind that, but I do use that piece of advice because great grandma says so!


Basically, as you will see in the recipe down below, that gorgeous caramel is nothing more then a hot sticky bath for salted almonds to roll into...so that they can look like this:


And then they get rolled again into a dark chocolate ganache, so that they can look like this:


And THEN finally, they get rolled into unsweetned cocoa and decorated with jewels of crispy salted caramel (which are actually the pieces of hardened caramel that get stuck on the pan- I break them off and use them for decoration).


So there it is (above with another strawberry flavoured chocolate thing I did). One thing however: it was a pain in the butt to balance out the salt. My almonds were already salty, but I didn't taste any saltiness once they were caramelized. So I kept adding salt, and more of it, and more of it, and realized that the quantities I was adding went far beyond a "pinch of salt"...until I could FINALLY start tasting something!!! I had to keep nibbling pieces of almonds, and then see how it came out with the ganache- because that would hide the saltiness even more- so at the end of so much tasting, I gave up, and left it to my tasters who found the proportions just right. Phew!


As for the recipe, I'm not precise with the dosages, but the most important bit is using a good logic for the ganache. I usually make it this way:


Salted Caramel Almond Chocolate Truffles


Ingredients:

For the ganache:


  • 100gr dark chocolate


  • 50 gr cream


For the salted caramel almonds:


  • Salted almonds (count the number of truffles you want to make, 1 almond per truffle)


  • Sugar (enough to make caramel that would coat your chosen quantity of almonds)


  • Salt- just incase


  • Unsweetened cocoa for final coating


How to make'em:


  1. Bring cream to heat until it starts bubbling, but don't let it burn!!


  2. Remove from heat, and add the chocolate. Swirl and let it melt to form a smooth non-bumpy shiny ganache


  3. Cover and place in fridge for about 1 hour


  4. In the meantime...Start making caramel- sugar in a pan over heat. If it hardens, add a bit of water gradually


  5. While it's still liquidy and in it's perfect golden colour, add the almonds. Use a wooden spatula and keep mixing so that the almonds don't stick to the pan.


  6. Remove almonds and place on a plate covered with baking paper. The almonds should normally be easy to seperate incase they are stuck to each other


  7. 1 hour has gone by...take the ganache out of the fridge and prepare your mise-en-place: essential for non-messy truffle making. Have the ganache, cocoa, almonds, and an empty plate ready in the correct order (whatever you feel most comfortable with)


  8. Roll each each almond into the ganache, and then roll into the cocoa. One almond per truffle. If you have some hardened caramel leftover in your pan, you can use that to decorate your truffles.


In France, truffles are quite a Christmas-y thing, so I think I will be making those again to share and to give away!

The 3 Cs- guess what they are!

Wow, well for the very first time I am actually going to post a recipe! Hurrah! I never post recipes- maybe because I don't really follow any..? Anyway, so where do I start...


The three Cs, yes, so what exactly does that stand for? Not the three commandments (even though there are 10), and not the Citroen C3 car (a remark my brother made- I hadn't even thought of that! sheesh! talk about men and cars!). It stands for the cake I had been wanting to make since weeks: an upside down cherry cinammon chocolate cake. Hence: 3 Cs.


It's very easy to make. All you need is a bunch of cherries- or canned ones if it's not the time of the year for cherries. I admit to have used some that came in a jar, which means less work to remove the pits. Ah also- I personally prefer using morello cherries because they have a slightly bitter taste, which doesn't make deserts too sweet.

So this C3 cake is really easy to make, it looks good, and has a warm home-y feeling to it which is always a nice thing for our stomachs. It's an upside down cake, which means that the fruits go first at the bottom of the mould, and I guess they caramelize with the sugar while baking in the oven. As for the batter- I went for chocolate, but it can also be a "white" batter for a stronger colour contrast...and a different taste. The only one thing I wish I had added was pistachios for decorating and for some crisp! And for some dashes of colour! But I did not have any pistachios on hand that time...

Of course, you can play around with almost any fruit and flavours- so it makes this recipe very versatile indeed. The fruits just need to be chunky enough I guess.

And now for the recipe! (I suck at writing recipes- watch)


C3 Upside down Cake (cinammon,cherries & chocolate):


Ingredients:


  • 50 gr melted butter


  • 50 gr dark chocolate


  • 2 eggs


  • 60 gr sugar


  • 1 teaspoon cinammon


  • 60 gr flour


  • baking soda


  • pinch of salt


  • 1 big tablespoon of sugar mixed with 1/2 teaspoon of cinammon


  • A lot of cherries (with no pits)- enough to cover the bottom of a cake mould (just one layer is enough).


Making and baking it:


  1. Preheat oven to th5. Melt the chocolate. Once that's done, mix in the butter. Set aside.

  2. Beat the eggs, sugar and cinammon (I know most people add cinammon in with the flour, but I like to add it in this step).

  3. Then add the flour + baking soda + pinch of salt. Mix well. Leave the batter aside for a while and start preparing the cherry base.

  4. Mix the 1 tablespoon of sugar with the 1/2 teaspoon of cinammon.

  5. Sprinkle this combination on the bottom of a buttered cake mould. Sprinkle a lot of it because this is going to help create caramelization during the baking.

  6. Add the cherries to form one layer. Keep the cherries close to one another to block any gaps.

  7. Then add the chocolate cake batter

  8. Put in the oven th5 for 40 minutes.

  9. Pull out, let cool, and flip upside down on a plate. Eat and enjoy! You can sprinkle with pistachios or icing sugar for a decorative touch.


You can eat this plain, or serve it with some sinful straight-to-the-hips rich cream, or do what I did: cut a slice and top it in on a bowl of tiramisu icecream! This was very randomly done, but it ended up tasting fabulous!

Nov 5, 2007

Back from Milan, and why haven't I been to Sicily yet?!

Most bank holidays in France are synonymous with 4 day long weekends- and we just had one of them last week. And so what better to do then hop off to Italy for a short trip? (which is exactly what I did). Destination Milan this time (although I have been there before, but I went in August when the city was dead and only 30% of the shops were open). A much more vivid, dynamic and interesting Milan. A Milan I actually wouldn't mind living in!

Fortunately, the weather was fantastic- considering it was November and I was expecting some chilly winds, but that was not the case. Instead, there was plenty of sunshine, soft breezes, and gorgeous autumn colours on Milan's classy grey backdrop.

I have always loved Italy, for as long as I can remember. Actually, to be more precise, my love affair with Italy started in '94 whilst watching the world cup final (it was Italy-Brasil). Why exactly at that moment, I will not tell because the story is a bit embarassing to share. Well, let's just say it had something to do with an 11 year old girl falling "in love" with one of the Italian football players...which led her (me) to think that if Italian men were that gorgeous, then Italy must have plenty of other gorgeous secrets...that I wanted to discover- and still do- until today.

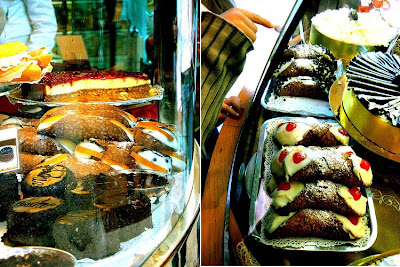
I started self-teaching myself Italian, and two years ago started taking proper Italian lessons (was about time!). I try to visit Italy whenever I can- have been to Milan, Rome, Napoli and Venice so far, but my ultimate dream is to head way down south to Sicily. The reason is simple: gelati and cannoli .The two things I look most forward to each time I am in Italy. Cannoli in particular.

There is something extraordinary about cannoli, I could literally live off it, have it for breakfast, lunch, tea time and dinner! It's simple, yet has such a unique and magical taste. There is something "friendly" about them- maybe the generous ricotta based stuffing? Maybe it shares many ingredients that are used in Middle Eastern sweets (I have Middle Eastern origins) and therefore creates an unconscious sense of tastebud-familiarity? It ranks in my top 10 preferred sweets list, and placed ahead of macarons because it isn't as "arrogant" as a macaron. And that is probably what I really love about cannoli- is that they are down-to-earth. I know cannoli are not human beings, but they do have that humane, modest, generous, down-to-earth quality.

So who really cares about the shopping in Milan, when the city has cannoli every 500 meters?


When I returned to Paris, with my heart still in Italy, I told myself that it is about time I actually try making cannoli myself! All I need now is to find those cannoli tubes... So hopefully, soon I will be posting pictures and words about my first home-made cannoli!