Jan 19, 2008

The glorious macaron

I can feel it- my waistline HAS gotten bigger. The damages after the holiday season have happened. Sigh...For that reason, I have stopped the baking for a while until my stomach gets a bit flatter! Keep the flour, eggs, sugar and butter away from me... hopefully for not too long though!

But temptation is always lingering around the corner... Wanted to go on a diet, but instead I receive a wonderful box of macarons from Ladurée... how to resist? Impossible!

So silly me, I thought that if I photographed them instead of eating them, maybe that could help calm down my macaron craving - wrong! Fortunately however, I don't feel as guilty as macarons are always a pleasure to photograph. They are luxurious but fun, and most of all very inspirational. I especially enjoy linking them to girly accessories- rings, necklaces, lipstick and bags! A while back I had tried out taking such photos, and today I have the continuation. Although I am by far not a professional photographer (still probably need 100 years until that happens), but I do love sharing - food and photos! Enjoy! (you can also see them on my flickr stream www.flickr.com/photos/mariannaf)

Where it all starts...opening the box!

Jan 12, 2008

Just a classic carrot cake!

Well, it sure seems that I have been blogging classics lately- chocolate chip cookies, now carrot cake...what next?

Maybe it's because I've been a busy bee these last few days, with baking sessions schedueled in the wee hours of the day..."midnight baking" should I say! So there will be less talking this time, but more photos and a recipe at the end- a carrot cake recipe because, well, there were some sad looking carrots lying around in the kitchen and I felt I had to make some good use of them! Everyone has their very own carrot cake recipe, and mine has turned out quite well in the past years :-)


Recipe for carrot cake:

Ingredients (for a small cake mould):

  • 2 eggs
  • 100gr sugar
  • 1 teaspoon cinnammon
  • 1/4 teaspoon nutmeg
  • 1 teaspoon rhum
  • 100gr butter
  • 100gr flour
  • 60gr ground walnut
  • Baking powder
  • 3 grated carrots

How to make it:

  1. Preheat oven to 180-190C.
  2. In a bowl, beat eggs, sugar, cinnammon, nutmeg and rhum together.
  3. Then add the melted butter. Mix well.
  4. Follow with the flour, ground walnut, baking powder and carrots. Mix batter well.
  5. Pour batter into mould, and bake for 45 minutes.
  6. When ready, take out of oven, let cool and enjoy plain or with your favourite topping- cream cheese, icing sugar... whatever your tastebuds crave for!

Jan 9, 2008

There needs to be a chocolate chip cookie recipe somewhere in here...

I figured that my blog may seem incomplete without a classic - chocolate chip cookies. Although they are not something I bake too often, I still have not found the secret to those chewy soft cookies that they sell at American stores over here...or at Starbucks even! What is that damn secret?!! If the answer is in one of those ready-mix boxes that are just missing an egg...well I won't give into that. In the meantime, here is a Lindt recipe with my addition of caramelized peanuts. Enjoy!


Recipe for chocolate chip & caramelized peanuts crispy cookies:

Ingredients:
  • 250gr butter
  • Vanilla essence
  • 300gr sugar
  • 1 egg
  • 340gr flour
  • 1/2 teaspoon baking powder
  • 300gr chocolate diced
  • 150gr caramelized peanuts

How to make it:

  1. Preheat oven to 180-190C
  2. Beat butter, vanilla essence, sugar and eggs until frothy
  3. Add in the flour and baking powder. Mix well
  4. Then add the chocolate and peanuts. Mix all, place in a bowl and in the fridge for at least 1 hour.
  5. With a spoon, dipose balls of cookie dough on the baking pan, keeping 3cm distance between each cookie.
  6. Bake for 15mins. When ready, remove and let cool.

Jan 5, 2008

Holiday season isn't quite over yet...

Who wants to be a king? It's the moment to feast upon the Galette des Rois! Even though it has been days that these golden treats have been exposed at boulangeries and patisseries accross France, today is the official day to enjoy one.

So holiday season indeed isn't over yet- and that directly implies that your waist line hasn't stopped increasing! Unless you can resist all the delicious goodness that has been happening since December... but that would never be the case for me.

As with Christmas' buches, patissiers in France have been flirting with the traditionnal galette to present one with a more personal touch. It seems that raspberries have been quite "the" ingredient to use this year as I've spotted quite a lot of galettes that include the divine pink fruit.

Of course, there are some names I naturally keep an eye on- Fauchon, Ladurée, Pierre Hermé, etc- to see what they've kept in store for this year's Epiphany. And so I compiled a small collection of some interesting approaches to the galette des rois:


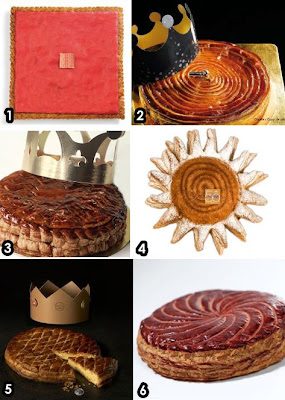
1- Raspberry & Vanilla square shaped galette from Fauchon. (more on http://www.fauchon.fr/)
2-Beautifully named "Coeur de Rubis" includes rasbperry, almond and chocolate flavours; from Dalloyau (more on http://www.dalloyau.com/)
3-Gingerbread flavoured frangipane from Ladurée (more on http://www.laduree.fr/)
4-The Lenotre "galette jubilé" amazes one with roasted apples, calisson d'Aix paste and passion fruit (more on http://www.lenotre.fr/)
5-Loyal to tradition, a classic galette from Paul (more on http://www.paul.fr/)
6-Pierre Hermé's Ispahan galette- need I say more? (more on http://www.pierreherme.com/)

As you can see, the above descriptions all sound terribly mouthwatering and I'm sure are all worth a try. However, as much pleasure as they may provide, there is also an immense pleasure in home made galettes. In sticking to the historical idea that a galette should ressemble a golden sun, I tried my own thing and found myself drifting far far away from mr.puff pastry!

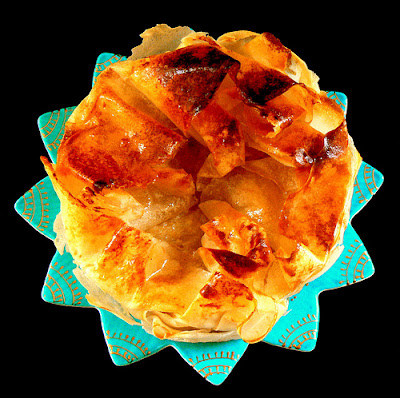
I went for phyllo instead- seven layers of phyllo to be precise! I guess this may be in reference to my origins (Middle Eastern and Greek) but in no way was it somesort of a round baklava! Replacing the nuts was a mixture of fresh apples and marzipan- and not frangipane because I have an issue with eggs. Imbedded in between the layers of crispy phyllo (lightly brushed with honey and butter), this galette of mine came out of the oven ressembling a flaming golden sun. What I was particularly pleased with was the taste of fresh apples- it added a fruity touch and there was a real taste of apples in there- not some kind of artificial apple flavouring. That's the nice thing about home baking- you get the real flavours of ingredients shining through.

If any of this sounds tempting to you, scroll down for the recipe:

Recipe for a phyllo galette des rois:

Ingredients:
  • 7 layers of phyllo
  • 3 large apples
  • A bar of marzipan
  • 1-2 tablespoons of melted butter combined with 2 tablespoons of honey

How to make it:

*Your mould needs to be smaller than the size of each phyllo sheet- this is essential!

  1. Preheat oven to th4/180C. Peel apples, remove seeds, cut in quarters and place in a mixer with the marzipan until you obtain a thick paste. Set aside.
  2. Butter the mould you will be using, and place a first sheet of phyllo.
  3. Lightly brush the phyllo with the butter/honey mix.
  4. Place on top a second layer of phyllo, and brush with butter/honey mix. Repeat process until five layers have been used.
  5. On top of the fifth layer, spread the apple/marzipan paste. Cover with a sixth layer of phyllo, and repeate. Cover with a seventh layer of phyllo and repeat.
  6. At this point, you have phyllo borders overflowing from the mould. Gently fold them inwards as if you were "closing" the galette.
  7. When "closed", drizzle over the honey/butter mix to "glue" everything well together.
  8. Bake in oven for 30 minutes.

Remember to place the fève somewhere in there!

P.S: If anyone is interested, there is an article in French newspaper Le Figaro about how to identify a top knotch galette! http://madame.lefigaro.fr/cuisine/en-kiosque/992-comment-reconnaitre-une-bonne-galette-des-rois/1

*Crown image is from a Vivienne Westwood creation.

Jan 4, 2008

The LBD of sweet treats


Panna cotta- the epitome of a classic dessert. The LBD of sweet treats. The glory of Italian deliciousness. Elegant and versatile- paint it with any colour, everything matches with it's innocent angel like white allure. Could it be one of the most beloved culinary delights in the world?
Inject some citrus energy into it, and you've got an orange-clementine panna cotta ready to be devoured. Even though such a thing has no place in my detox plan (eheeem)... but I just could'nt resist!


Actually, can you believe it- this is probably only the second time in my life that I've made panna cotta. I know that I've made it before back in university, but I wasn't such a big fan of it then, which led me to pay almost no attention to how it's prepared. Gees, I can't believe that I actually did not pay attention to how a panna cotta is fabricated! That's like a kitchen-crime!


Well, to catch up, here is my panna cotta which I now realize is probably one of the easiest desserts to make in the world- and plus, is always a crowd pleaser. Could it be anymore perfect, may I ask?


For the photos, I had fun peeling off clementine twirls, and figuring out how to wrap it around the glass...even though it did take many trials until I got something decent looking. I'm wondering if I should start a series of desserts that include fruit ingredients, and photograph them as if they were bursting out of the fruit itself... I guess I'll get to it one day. Maybe I need to work on how to make proper use of lighting first. Sigh. Sometimes I wish I had some ultra professional studio and tons of equipment to help me take better photos... but all I have for the moment is a secret corner I found in my kitchen, and patience to wait for the right moment of the day when the natural light seems to work best.


Anyhow, as I'm extremely tired and soon I'll probably be writing complete jibberish, I better cut this short and save energy to write the recipe.


Oh by the way, I also changed my blog's layout and colour scheme. Ditched the dominant dark brown look- was never really too comfortable with it! I hope my blog looks nicer now :-)


Recipe for orange-clementine panna cotta:

Ingredients:

  • 400ml liquid cream

  • 200ml milk

  • Sugar (optional - I didn't use any)

  • 3 gelatin sheets (each sheet being 2gr)

  • Orange coulis

  • Clementines
  • Sugar


How to make it:

  1. Place the gelatin sheets in a bowl of cold water for about 5 mins- until they become all soft and gooey.

  2. In the meantine, heat the cream and the milk (and sugar-optional) in a pan. Do not let it boil however!!
  3. When it's liquid is hot, pull out the gelatin sheets (that have been drained) and place them in the hot liquid. With a wooden spoon, mix well until gelatin has dissolved completely. Let liquid cool just a bit.

  4. Rinse your panna cotta glasses with cold water- do not try them. Then pour in each the liquid mix, and then place in fridge for at least 4 hours until panna cotta sets.

  5. When ready, dice some clementine slices and slightly caramelize them in a hot pan with sugar. Add in the orange coulis, and mix all together to obtain a somewhat "chunky" coulis. Drizzle over panna cotta, and enjoy!

LBD dress from http://www.fancyephemera.com/

Jan 1, 2008

Sugar Escapade

To start off, Happy New Year everyone! I hope '08 turns out to be a very blissful and healthy year! Although I never quite understood why new year celebrations were THAT big of a deal... it's not like your life changes overnight because the last number of the year becomes an 8 instead of a 7... I also think there is something impersonal about new year celebrations... the moments of change really come when you lose your first tooth, graduate, get your first job, fall in love, start on a new project... these are the real moments that mark one's life and are worth remembering and celebrating.

Anywhoo, enough bla bla.

Let's talk about cake! Just a little more cake talk for me before I go on a 3 day detox plan... all that food stuffing over the holiday season needs to stop!
So, back to cake. Well, the story is that I wanted to try using a lot of grapefruit in something sweet. Grapefruit is not an ingredient I use too often when making desserts. Either it's a breakfeast food item, or on the sweet side, it's a sorbet. But what about it in cake? I find it such a beautiful fruit, with refreshing vibrant colours. It could only work in a cake that screams summer!
Initially, my ideas were floating around grapefruit and Campari... but because there was no Campari at home, and I was too impatient to bake, I put that idea aside- for the meantime. Then I was concerned with balancing out the bitterness from the grapefruit. It needed to be part of something sweet and tender, which suddenly brought back some nostalgic thoughts into my head. My mom used to make this signature cake which was something like a spongecake, literally bathed in freshly squeezed orange juice (sweetened), and then coated with whipped cream and coconut. It's without a doubt my mother's signature cake, and each bite is meaningful and packed with memories. So I decided to do something slightly similar, but not quite, which led me to this:

It looked pretty, smelled nice, and tasted absolutely wonderfully great! I just wish I had added way more fruits though. The cake texture is perfect, and each spoonful melts in your mouth bringing in exotic flowers, beach waves, sunrays, and pink skies... But beyond all that, what I enjoyed the most was the satisfaction baking (and cooking) can provide. I really do look forward for more memorable kitchen moments in 2008! For the recipe, scroll down...

Recipe for summer escapade:

Ingredients


  • 3 eggs
  • 150gr sugar
  • 150gr butter
  • 170gr flour
  • Baking powder
  • Pinch of salt
  • 200cc coconut milk
  • 300cc fresh liquid cream
  • Shredded coconut
  • Grapefruit, litchis, and raspberries

How to make it:

  1. Preheat oven to th5
  2. Whisk the eggs and sugar together.
  3. Beat in the butter. Mix
  4. Follow with the flour, baking powder, and pinch of salt. Mix batter well.
  5. Place batter in mould and bake for 40-45 mins.
  6. When cake is ready, pull out of oven, let cool and then slice horizontally.
  7. In the meantime, whisk the cream until it becomes whipped cream. Set aside in the fridge.
  8. Drizzle over each cooled cake slice the coconut milk.
  9. On the bottom cake slice, add the fruits- grapefruit, litchis and raspberries.
  10. Close the cake with the upper slice.
  11. With a spatula, cover the top and sides of the cake with the whipped cream, and sprinkle all over with shredded coconut.
  12. Place cake in fridge for about an hour before serving.